前言[挖坑]

这是我第二次打字写前言,因为前一次鼠标掉到地上,刚好按到X关掉了编辑器…….
[北理工破防音]现在是6月21号,晚上的23:10,星期二,
今天一整个下午和晚上都在做模型训练的数据集的标注,就是在一张图片里框选出要识别的内容[类似手画人脸识别时候脸周围的框],一共4000张。下午请一朋友吃饭连哄带骗替我弄了1500张,临走时我问明天中午还请他吃饭怎么样他连忙拒绝,总之就是这一过程极其痛苦emm[突然想起欠lxy一顿饭,可以再连哄带骗让他给我打工一次]
自然我这种懒虫会想办法减少自己的工作量,于是。。。

键盘监听与模拟[第一步工作]

这个就是随手一写:

1
2
3
4
5
6
7
8
9
import keyboard
import pyautogui
while (True):
keyboard.wait(' ')
pyautogui.keyDown("ctrl")
pyautogui.press("s")
pyautogui.keyUp("ctrl")
pyautogui.press("right")
pyautogui.press("r")

当按下空格时,就会自动按下ctrl+s来保存标注内容,按下右键切换下一张,按下r进入矩形框选模式[空格本身是退出框选进行移动的快捷键,但是空格用起来舒服hhh所以加上了这个]

但是这样仍然需要手动鼠标拖动进行框选,虽然可以自动保存和翻页,但是还是很累,于是有了这个设想。
能不能这样,先拍几张背景图和识别目标的照片,然后对目标图做随机的仿射变换,RGB值随机变化模拟不同光照环境,再进行随机的鱼眼效果处理来更加逼近真实相机拍摄效果,最后叠加在随机的背景图[对背景图做随机RGB波动]的随机位置,根据这组随机数就可以自动计算出应该框选的坐标,于是可以自动同时完成训练数据集的生成和标注。
这样不仅不用人工标注数据集,甚至不需要拍摄大量照片作为数据集

挖坑完毕,开始肝!

最终全自动方案

不着急,坑慢慢填,没看见前面还是ros笔记的文章还空着吗

现在的进度:导入opencv库:

1
import cv2

好了本文结束[doge]

仿射变换

下面步入正题,首先是对识别目标的仿射变换

1
2
3
4
5
6
7
8
9
10
import cv2
import numpy as np
img = cv2.imread('auto-marking.png', 0)
rows, cols = img.shape
M = np.float32([[1, 0, 200], [0, 1, 100]])
dst = cv2.warpAffine(img, M, (cols, rows))
cv2.imshow('img', dst)
k = cv2.waitKey(0)
if cv2.waitKey(0) == 27:
cv2.destroyAllWindows()

这里仅仅进行了平移操作,主要区别在于M的定义:

平移

1
M = np.float32([[1, 0, 200], [0, 1, 100]])

经过仿射变换后的点的坐标是(x+200,y+100),即将整个图像平移(200,100)

旋转

1
M = cv2.getRotationMatrix2D((cols / 2, rows / 2), 90, 1)

cv2.getRotationMatrix2D函数可以生成图像旋转的所需要的矩阵
第一个参数是旋转中心,第二个是旋转角度[正数逆时针],第三个是放大倍数

三点定位

1
2
3
4
cv2.getAffineTransform(src,dst)  #返回2*3的转变矩阵
  #参数:
   #src:原图像中的三组坐标,如np.float32([[50,50],[200,50],[50,200]])
  #dst: 转换后的对应三组坐标,如np.float32([[10,100],[200,50],[100,250]])

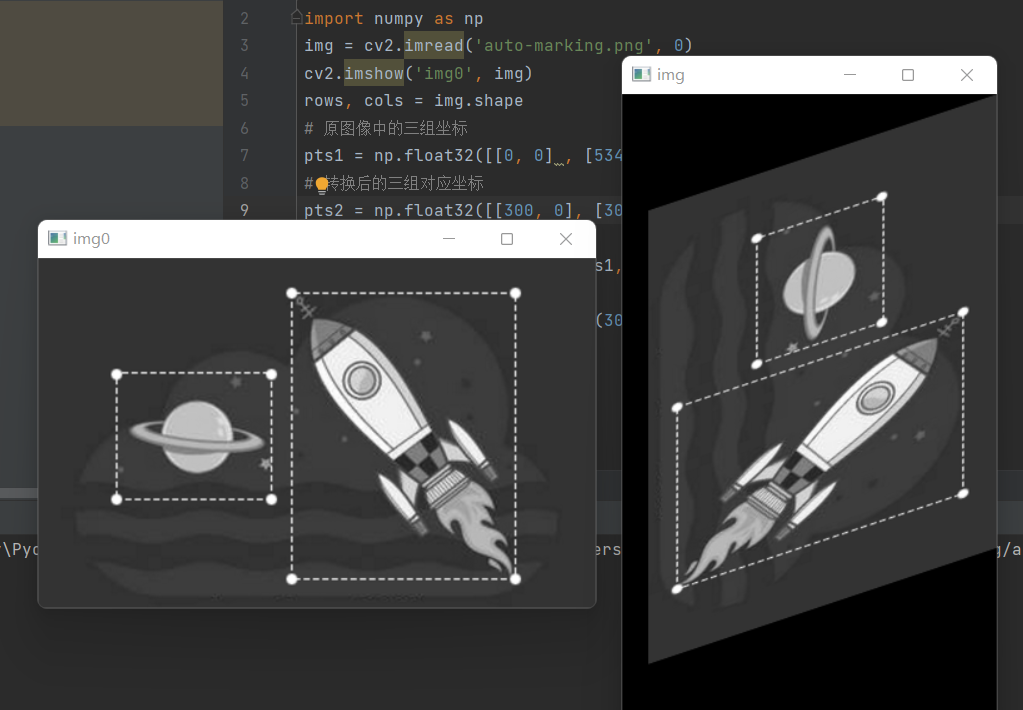
举例:

1
2
3
4
5
6
7
8
# 原图像中的三组坐标
pts1 = np.float32([[0, 0] , [534, 0], [534, 300]])
# 转换后的三组对应坐标
pts2 = np.float32([[300, 0], [300, 434], [0, 534]])
# 计算仿射变换矩阵
M = cv2.getAffineTransform(pts1, pts2)
# 执行变换
img = cv2.warpAffine(img, M ,(300, 534))

透视变换[3维]

与之前不同的是,我们需要使用另外两个方法getPerspectiveTransform()和warpPerspective(),仿射变换矩阵M变成了3*3矩阵

1
2
3
4
5
6
7
8
9
10
11
12
13
cv2.getPerspectiveTransform()   返回3*3的转变矩阵
参数:
src:原图像中的四组坐标,如 np.float32([[56,65],[368,52],[28,387],[389,390]])
dst: 转换后的对应四组坐标,如np.float32([[0,0],[300,0],[0,300],[300,300]])

cv2.warpPerspective()
参数:
src: 图像对象
M:3*3 transformation matrix (转变矩阵)
dsize:输出矩阵的大小,注意格式为(cols,rows) 即width对应cols,height对应rows
flags:可选,插值算法标识符,有默认值INTER_LINEAR
borderMode:可选, 边界像素模式,有默认值BORDER_CONSTANT
borderValue:可选,边界取值,有默认值Scalar()即0

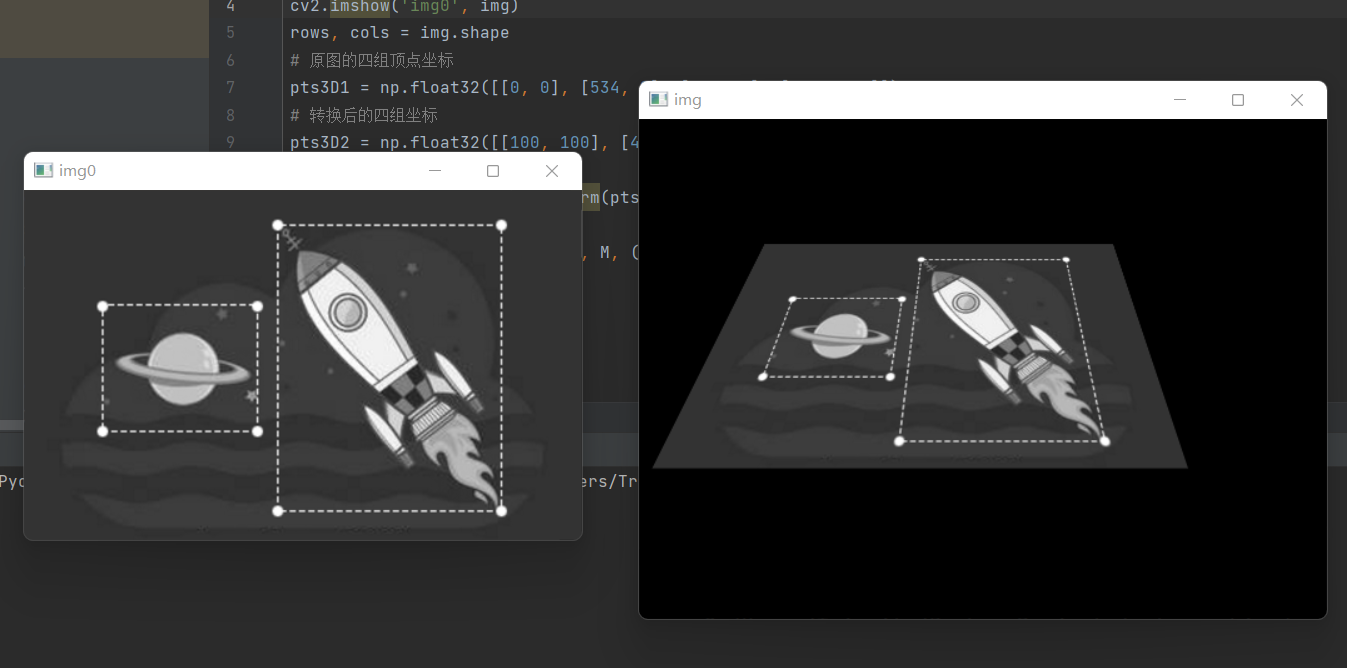
举例:

1
2
3
4
5
6
7
8
# 原图的四组顶点坐标
pts3D1 = np.float32([[0, 0], [534, 0], [0, 300], [534, 300]])
# 转换后的四组坐标
pts3D2 = np.float32([[100, 100], [434, 100], [0, 300], [534, 300]])
# 计算透视放射矩阵
M = cv2.getPerspectiveTransform(pts3D1, pts3D2)
# 执行变换
img = cv2.warpPerspective(img, M, (550, 400))

图像叠加-mask掩模

由于经过变换后的图像周围有黑边,所以需要经过处理去黑边再叠加

如果直接叠加两个图像,图片将改变颜色
所以cv2.add()并不可行
如果融合两个图像,会得到透明的效果
所以cv2.addWeighted()也不可行
实现的方法是图像mask掩模

1
2
3
4
5
6
7
8
9
10
11
12
13
14
15
16
17
18
19
20
21
22
23
24
25
26
27
28
29
30
31
32
33
34
35
36
37
38
39
40
41
import cv2

x=500
y=500

img1 = cv2.imread("332.png") # 读取背景图
img2 = cv2.imread("233.png") # 读取要填充的图像
rows, cols, channels = img2.shape
roi = img1[x:rows+x, y:cols+y]

# 原始图像转化为灰度值
img2gray = cv2.cvtColor(img2, cv2.COLOR_BGR2GRAY)
cv2.imshow('img2gray', img2gray)
cv2.waitKey(0)

# 二值化,得到ROI区域掩模
ret, mask = cv2.threshold(img2gray, 200, 255, cv2.THRESH_BINARY)
cv2.imshow('mask', mask)
cv2.waitKey(0)

# ROI掩模区域反向掩模
mask_inv = cv2.bitwise_not(mask)
cv2.imshow('mask_inv', mask_inv)
cv2.waitKey(0)

# 掩模显示背景
img1_bg = cv2.bitwise_and(roi, roi, mask=mask)
cv2.imshow('img1_bg', img1_bg)
cv2.waitKey(0)

# 掩模显示前景
img2_fg = cv2.bitwise_and(img2, img2, mask=mask_inv)
cv2.imshow('img2_fg', img2_fg)
cv2.waitKey(0)

# 前背景图像叠加
dst = cv2.add(img1_bg, img2_fg)
img1[x:rows+x, y:cols+y] = dst
cv2.imshow('res', img1)
cv2.waitKey(0)
cv2.destroyAllWindows()

实现效果:csdn截图叠加在物理课截屏上

在原作者文章基础上做了增加x,y参数的改进,原作者效果图:(图片即原文链接)
并且由于原文章背景白色而仿射变换出现的背景为黑色,所以后面代码做了相应调整

原文效果

随机缩放

opencv笔记关于缩放的内容

RGB随机化

实际拍摄中不可能光照等环境完全相同,颜色必然有一定偏差,所以这必须模拟出来

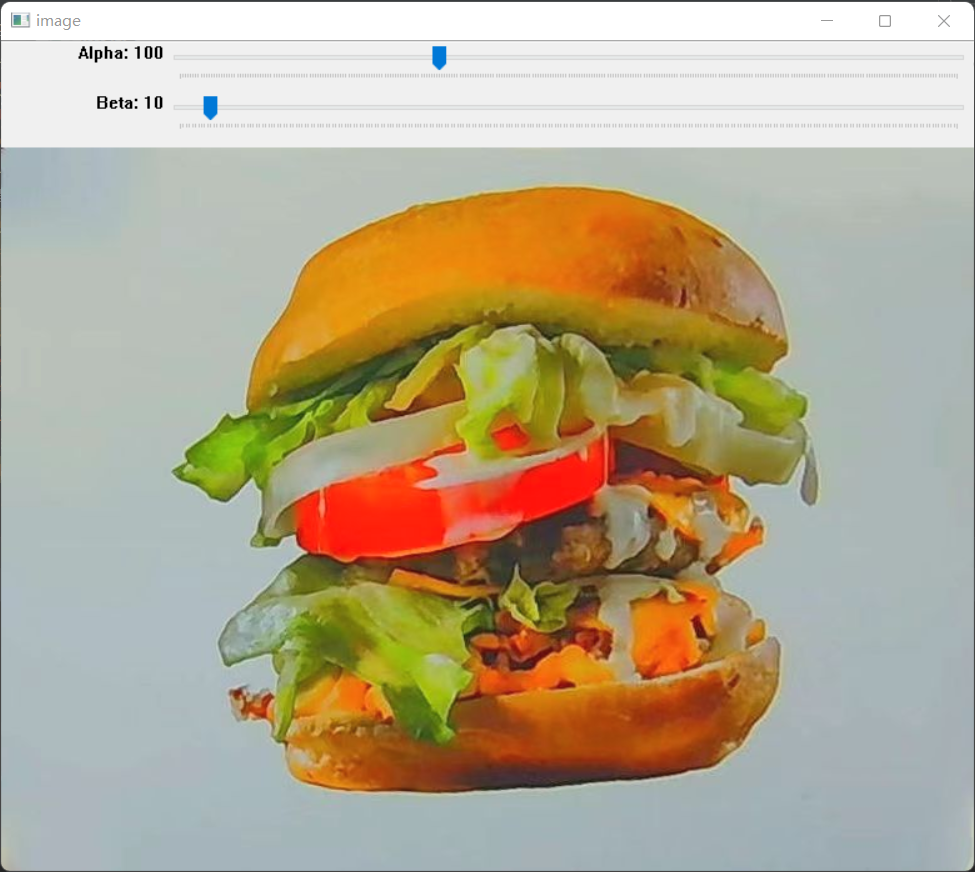
亮度对比度

实在没啥意思直接复制了一个

1
2
3
4
5
6
7
8
9
10
11
12
13
14
15
16
17
18
19
20
21
22
23
24
25
26
27
import cv2
import numpy as np
alpha = 0.3
beta = 80
img_path = "food.jpg"
img = cv2.imread(img_path)
img2 = cv2.imread(img_path)
def updateAlpha(x):
global alpha, img, img2
alpha = cv2.getTrackbarPos('Alpha', 'image')
alpha = alpha * 0.01
img = np.uint8(np.clip((alpha * img2 + beta), 0, 255))
def updateBeta(x):
global beta, img, img2
beta = cv2.getTrackbarPos('Beta', 'image')
img = np.uint8(np.clip((alpha * img2 + beta), 0, 255))

cv2.namedWindow('image')
cv2.createTrackbar('Alpha', 'image', 0, 300, updateAlpha)
cv2.createTrackbar('Beta', 'image', 0, 255, updateBeta)
cv2.setTrackbarPos('Alpha', 'image', 100)
cv2.setTrackbarPos('Beta', 'image', 10)
while (True):
cv2.imshow('image', img)
if cv2.waitKey(1) == ord('q'):
break
cv2.destroyAllWindows()

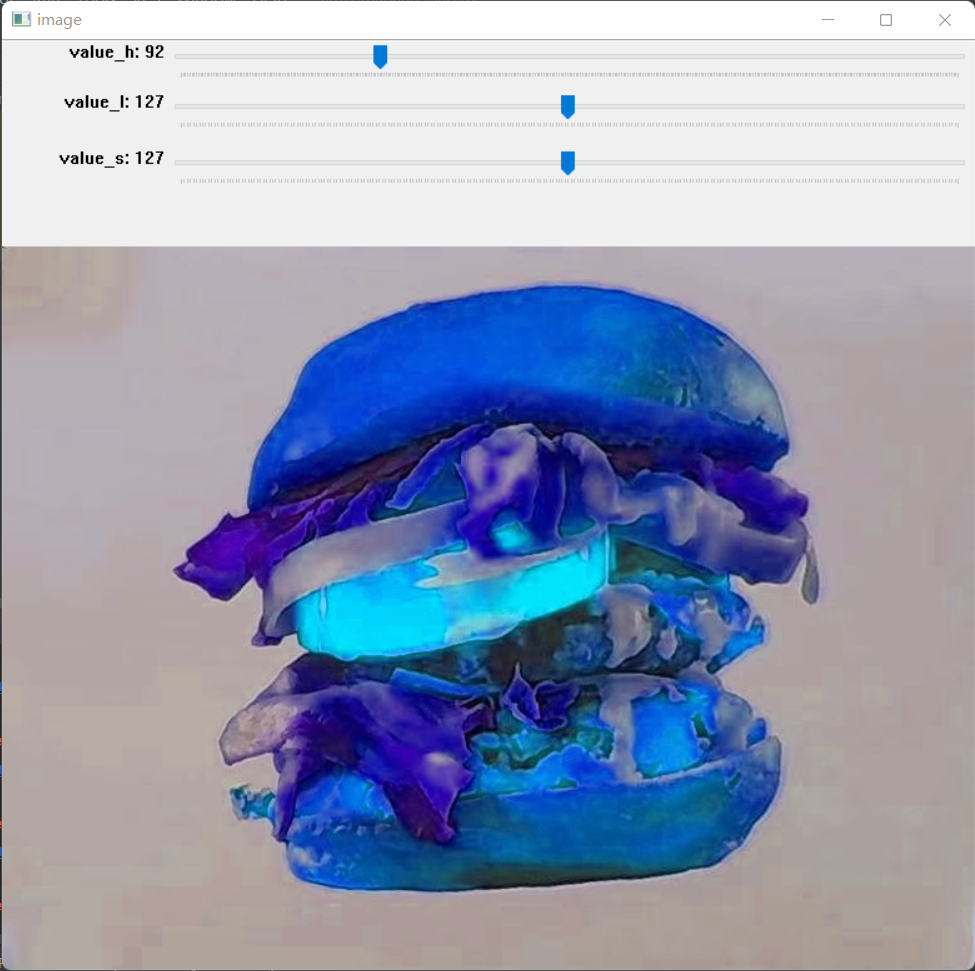
饱和度

再随手copy一个

1
2
3
4
5
6
7
8
9
10
11
12
13
14
15
16
17
18
19
20
21
22
23
24
25
26
27
28
29
30
31
32
33
34
35
36
37
38
39
40
41
42
43
44
45
46
47
48
49
50
51
52
53
54
55
56
57
58
59
60
61
62
63
64
65
66
67
68
69
70
71
72
73
74
75
76
77
78
79
80
81
82
83
84
85
86
87
88
89
90
91
92
93
94
95
import cv2 as cv
import numpy as np

# 全局变量
g_hls_h = [] # 图片分量 hls
g_hls_l = []
g_hls_s = []
# 滑动设置值
g_diff_h, g_diff_l, g_diff_s = 0, 0, 0

# 修改图片各分量 组合成新图片
def change_hls():
global g_hls_h, g_hls_l, g_hls_s, g_diff_h, g_diff_l, g_diff_s

# h分量
hls_hf = g_hls_h.astype(np.float)
hls_hf += g_diff_h
hls_hf[hls_hf > 180] -= 180 # 超过180
hls_hf[hls_hf < 0] += 180 # 小于0
new_hls_h = hls_hf.astype("uint8")

# l分量
hls_lf = g_hls_l.astype(np.float)
hls_lf += g_diff_l
hls_lf[hls_lf < 0] = 0
hls_lf[hls_lf > 255] = 255
new_hls_l = hls_lf.astype("uint8")

# s分量
hls_ls = g_hls_s.astype(np.float)
hls_ls += g_diff_s
hls_ls[hls_ls < 0] = 0
hls_ls[hls_ls > 255] = 255
new_hls_s = hls_ls.astype("uint8")

# 重新组合新图片 并转换成BGR图片
new_bgr = cv.cvtColor(cv.merge([new_hls_h, new_hls_l, new_hls_s]), cv.COLOR_HLS2BGR)
cv.imshow("image", new_bgr)

# h分量 值修改
def on_value_h(a):
global g_diff_h
value = cv.getTrackbarPos("value_h", "image")
value = (value - 180)
g_diff_h = value
change_hls()

# l分量 值修改
def on_value_l(a):
global g_diff_l
value = cv.getTrackbarPos("value_l", "image") * 2
value -= 255
g_diff_l = value
change_hls()

# s分量 值修改
def on_value_s(a):
global g_diff_s
value = cv.getTrackbarPos("value_s", "image") * 2
value -= 255
g_diff_s = value
change_hls()


def main():
global g_hls_h, g_hls_l, g_hls_s
img_org = cv.imread("food.jpg")

# hls分量拆分
hls = cv.cvtColor(img_org, cv.COLOR_BGR2HLS)
g_hls_h = hls[:, :, 0]
g_hls_l = hls[:, :, 1]
g_hls_s = hls[:, :, 2]

print(img_org.shape)

# 滑动条创建、设置初始值
cv.namedWindow("image")
cv.createTrackbar("value_h", "image", 0, 360, on_value_h)
cv.createTrackbar("value_l", "image", 0, 255, on_value_l)
cv.createTrackbar("value_s", "image", 0, 255, on_value_s)
cv.setTrackbarPos("value_h", "image", 180)
cv.setTrackbarPos("value_l", "image", 127)
cv.setTrackbarPos("value_s", "image", 127)

while True:
key = cv.waitKey(50) & 0xFF
if key == 27: # 退出
break

cv.destroyAllWindows()


if __name__ == '__main__':
main()

模糊

有的时候相机拍摄会有模糊现象,so:
以下内容引自我博客的文章opencv学习笔记

1
2
3
4
5
6
7
8
9
#中值滤波
#其中5表示在中心点5*5范围内计算,可改为大于1的奇数
result = cv2.medianBlur(image,5)
#高斯滤波
cv2.GaussianBlur(img,(5,5),1.5)
#均值滤波
cv2.blur(img,(5,5))
# 双边滤波
cv2.bilateralFilter(img,9,75,75)

后面代码采用的方式是随机大小的均值滤波。

整合以上

对图像的处理已经十分逼近实际拍摄情况,下一步就是综合全部编写程序了

仿射变换参数合理性判断算法

首先,使用随机数进行仿射变换时,有可能随机得到的四边形的凹四边形,仿射变换将会出现意外效果,为了判断四边形是否为凸四边形,我的方法是连接对角线,如果其余两点在线段两边则为凸。判断点是否在线段两边,采用向量叉积的方式,如果两组两个向量叉积异号则为在线段两侧,具体计算方法:

1
2
if ((x2-x1)*(y4-y1)-(y2-y1)*(x4-x1))*((x3-x1)*(y4-y1)-(y3-y1)*(x4-x1))<0 and ((x1-x2)*(y3-y2)-(y1-y2)*(x3-x2))*((x4-x2)*(y3-y2)-(y4-y2)*(x3-x2))<0 :
break

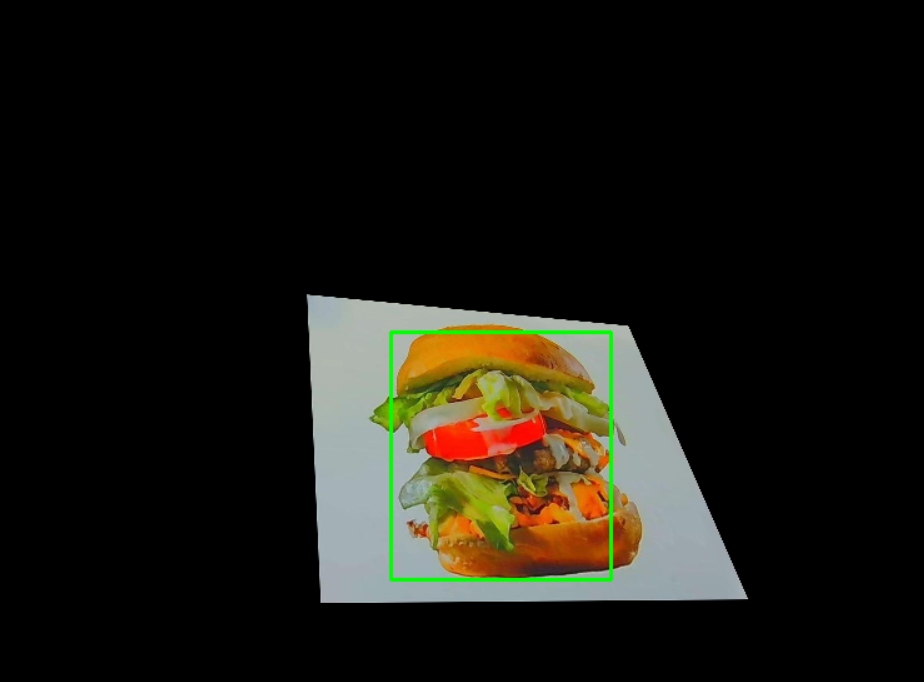
框选坐标计算算法

虽然经过仿射变换,但是图形比例不变,中点依然在对边中点连线的交点,此点即为矩形边框中点。矩形长宽可根据随机数生成四边形的最小外包矩形的一定比例计算,同样由于仿射变换图形比例不变,该比例具体数值即为原图里汉堡占整个图片的大小比例。

求框选长宽:

1
2
xx = max(x2, x4) - min(x1, x3)
yy = max(y3, y4) - min(x1, x2)

求两直线交点:

1
2
3
4
5
6
7
8
9
10
11
12
13
14
15
16
17
18
19
20
21
22
23
24
def calc_abc_from_line_2d(x0, y0, x1, y1):
a = y0 - y1
b = x1 - x0
c = x0*y1 - x1*y0
return a, b, c

def get_line_cross_point(line1, line2):
# x1y1x2y2
a0, b0, c0 = calc_abc_from_line_2d(*line1)
a1, b1, c1 = calc_abc_from_line_2d(*line2)
D = a0 * b1 - a1 * b0
if D == 0:
return None
x = (b0 * c1 - b1 * c0) / D
y = (a1 * c0 - a0 * c1) / D
# print(x, y)
return x, y

if __name__ == '__main__':
# x1y1x2y2
line1 = [0, 5, 0, 10]
line2 = [5, 0, 10, 0]
cross_pt = get_line_cross_point(line1, line2)
print(cross_pt)

按照合适的比例绘制矩形框:

1
cv2.rectangle(img, (round(x0-xx/4), round(y0-yy/2.5)), (round(x0+xx/4), round(y0+yy/2.5)), (0, 255, 0), 2)

效果图:

这是已经完成的代码:

main.py

1
2
3
4
5
6
7
8
9
10
11
12
13
14
15
16
17
18
19
20
21
22
23
24
25
26
27
28
29
30
31
32
33
34
35
36
37
38
39
40
41
42
43
44
45
46
47
48
49
50
51
52
53
54
55
56
57
58
59
60
61
62
63
64
65
66
67
68
import cv2
import numpy as np
import random
from funcs import *
import os
import threading

times = 1
photos = os.listdir(r'photo')
backs = os.listdir(r'back')


def data_maker(img, back, img_copy):
# 亮度
img = random_brightness(img)
back = random_brightness(back)
# 模糊
img = random_blur(img)
# 缩放
r = random.randint(5, 20) / 10
img = cv2.resize(img, (0, 0), fx=r, fy=r, interpolation=cv2.INTER_NEAREST)
img_copy = cv2.resize(img_copy, (0, 0), fx=r, fy=r, interpolation=cv2.INTER_NEAREST)
# 仿射变换
img, points = random_horizontally_affine(img)
xc, yc, wc, hc = points_affine(img_copy, points)
# 叠加
back, x, y = overlay(img, back)
xmin, ymin = (x + xc, y + yc)
xmax, ymax = (x + xc + wc, y + yc + hc)
return back, xmin, ymin, xmax, ymax


m = 0
n = 0


for i in photos:
datas = os.listdir('photo\\' + i)
for j in datas:
for k in backs:
for l in range(0, times):
m += 1
n += 1
img = cv2.imread('photo\\' + i + '\\' + j)
back = cv2.imread('back\\' + k)
rbn = backs[random.randint(0, len(backs) - 1)]
back[0:539, 960:1919] = cv2.imread('back\\' + rbn)[0:539, 960:1919]
rbn = backs[random.randint(0, len(backs) - 1)]
back[540:1079, 0:969] = cv2.imread('back\\' + rbn)[540:1079, 0:969]
rbn = backs[random.randint(0, len(backs) - 1)]
back[540:1079, 960:1919] = cv2.imread('back\\' + rbn)[540:1079, 960:1919]
img_copy = cv2.imread('photo_copy\\' + i + '\\' + j)
save, xmin, ymin, xmax, ymax = data_maker(img, back, img_copy)
cv2.imwrite("F:\\out\\photo_output\\" + i + '\\' + str(m) + '.jpg', save)
cv2.rectangle(save, (xmin, ymin), (xmax, ymax), (0, 255, 0), 2)
cv2.imwrite("F:\\out\\photo_marked\\" + i + '\\' + str(m) + '.jpg', save)
print((m, xmin, ymin, xmax, ymax))
txt = xml_save(str(m) + '.jpg', str(xmin), str(ymin), str(xmax), str(ymax))
path = 'F:\\out\\outputs\\' + i + '\\' + str(m) + '.xml'
fw = open(path, 'w')
fw.write(txt)
fw.close()
xx = xmax - xmin
yy = ymax - ymin
if not 0.2 < xx / yy < 2:
m -= 1
print('进度:'+str(n)+'/'+str(len(photos)*len(datas)*len(backs)*times))

funcs.py

1
2
3
4
5
6
7
8
9
10
11
12
13
14
15
16
17
18
19
20
21
22
23
24
25
26
27
28
29
30
31
32
33
34
35
36
37
38
39
40
41
42
43
44
45
46
47
48
49
50
51
52
53
54
55
56
57
58
59
60
61
62
63
64
65
66
67
68
69
70
71
72
73
74
75
76
77
78
79
80
81
82
83
84
85
86
87
88
89
90
91
92
93
94
95
96
97
98
99
100
101
102
103
104
105
106
107
108
109
110
111
112
113
114
115
116
117
118
119
120
121
122
123
124
125
126
127
128
129
130
131
132
133
134
135
136
137
138
139
140
141
142
143
144
145
146
147
148
149
150
151
152
153
154
155
156
157
158
import random
import cv2
import numpy as np


def calc_abc_from_line_2d(x0, y0, x1, y1):
a = y0 - y1
b = x1 - x0
c = x0 * y1 - x1 * y0
return a, b, c


def get_line_cross_point(line1, line2):
# x1y1x2y2
a0, b0, c0 = calc_abc_from_line_2d(*line1)
a1, b1, c1 = calc_abc_from_line_2d(*line2)
D = a0 * b1 - a1 * b0
if D == 0:
return None
x = (b0 * c1 - b1 * c0) / D
y = (a1 * c0 - a0 * c1) / D
# print(x, y)
return x, y


def random_brightness(img):
alpha = 0.01 * random.randint(-30, 30) + 1
beta = random.randint(-30, 30)
return np.uint8(np.clip((alpha * img + beta), 2, 255))


def random_blur(img):
n = random.randint(0, 10)
return cv2.blur(img, (2 * n + 1, 2 * n + 1))


def random_completely_affine(img):
while (True):
h, w, p = img.shape
w5 = round(w / 4)
w2 = int(w / 2)
h5 = round(h / 4)
h2 = int(h / 2)
x1 = random.randint(w5, w2)
x2 = x1 + random.randint(w5, w2)
x3 = random.randint(w5, w2)
x4 = x3 + random.randint(w5, w2)
y1 = random.randint(h5, h2)
y2 = random.randint(h5, h2)
y3 = y1 + random.randint(h5, h2)
y4 = y2 + random.randint(h5, h2)
points = [[x1, y1], [x2, y2], [x3, y3], [x4, y4]]
if ((x2 - x1) * (y4 - y1) - (y2 - y1) * (x4 - x1)) * ((x3 - x1) * (y4 - y1) - (y3 - y1) * (x4 - x1)) < 0 and (
(x1 - x2) * (y3 - y2) - (y1 - y2) * (x3 - x2)) * ((x4 - x2) * (y3 - y2) - (y4 - y2) * (x3 - x2)) < 0:
break
else:
print("warning" + str(points))
pts3D1 = np.float32([[0, 0], [w, 0], [0, h], [w, h]])
pts3D2 = np.float32(points)
M = cv2.getPerspectiveTransform(pts3D1, pts3D2)
return cv2.warpPerspective(img, M, (w, h)), points


def random_horizontally_affine(img):
h, w, p = img.shape
w2 = int(w / 2)
h2 = int(h / 2)
rx = random.randint(int(w2 / 6), w2)
ry1 = random.randint(int(h2 / 4), h2)
ry2 = random.randint(int(h2 / 4), h2)
x1, y1 = (w2 - rx + random.randint(-30, 30), h2 - ry1 + random.randint(-30, 30))
x2, y2 = (w2 + rx + random.randint(-30, 30), h2 - ry2 + random.randint(-30, 30))
x3, y3 = (w2 - rx + random.randint(-30, 30), h2 + ry1 + random.randint(-30, 30))
x4, y4 = (w2 + rx + random.randint(-30, 30), h2 + ry2 + random.randint(-30, 30))
points = [[x1, y1], [x2, y2], [x3, y3], [x4, y4]]
pts3D1 = np.float32([[0, 0], [w, 0], [0, h], [w, h]])
pts3D2 = np.float32(points)
M = cv2.getPerspectiveTransform(pts3D1, pts3D2)
return cv2.warpPerspective(img, M, (w, h)), points


def get_center(points):
xx = max(points[1][0], points[3][1]) - min(points[0][0], points[2][0])
yy = max(points[2][1], points[3][1]) - min(points[0][1], points[1][1])
x1 = (points[0][0] + points[1][0]) / 2
x2 = (points[1][0] + points[3][0]) / 2
x3 = (points[2][0] + points[3][0]) / 2
x4 = (points[0][0] + points[2][0]) / 2
y1 = (points[0][1] + points[1][1]) / 2
y2 = (points[1][1] + points[3][1]) / 2
y3 = (points[2][1] + points[3][1]) / 2
y4 = (points[0][1] + points[2][1]) / 2
points0 = [[x1, y1], [x2, y2], [x3, y3], [x4, y4]]
line1 = [x1, y1, x3, y3]
line2 = [x2, y2, x4, y4]
x0, y0 = get_line_cross_point(line1, line2)
return x0, y0, xx, yy


def points_affine(img_copy, points):
h, w, p = img_copy.shape
img_copy = cv2.warpPerspective(img_copy, cv2.getPerspectiveTransform(np.float32([[0, 0], [w, 0], [0, h], [w, h]]),
np.float32(points)), (w, h))
cv2.cvtColor(img_copy, cv2.COLOR_BGR2HSV)
img_copy = cv2.inRange(img_copy, np.array([0, 254, 0]), np.array([3, 255, 255]))
xc, yc, wc, hc = cv2.boundingRect(img_copy)
# cv2.rectangle(img_copy, (xc, yc), (xc + wc, yc + hc), 255, 2)
return xc, yc, wc, hc


def overlay(img, back):
h, w, p = back.shape
rows, cols, channels = img.shape
x = random.randint(0, round(w - cols))
y = random.randint(0, round(h - rows))
roi = back[y:rows + y, x:cols + x]
img2gray = cv2.cvtColor(img, cv2.COLOR_BGR2GRAY)
ret, mask = cv2.threshold(img2gray, 1, 255, cv2.THRESH_BINARY)
mask_inv = cv2.bitwise_not(mask)
img1_bg = cv2.bitwise_and(roi, roi, mask=mask_inv)
img2_fg = cv2.bitwise_and(img, img, mask=mask)
dst = cv2.add(img1_bg, img2_fg)
back[y:rows + y, x:cols + x] = dst
return back, x, y


def xml_save(file_name, xmin, ymin, xmax, ymax):
txt = '''<?xml version="1.0" ?>
<annotation>
<folder>pet</folder>
<filename>''' + file_name + '''</filename>
<path>F:\\air2\\pet\\''' + file_name + '''</path>
<source>
<database>Unknown</database>
</source>
<size>
<width>1920</width>
<height>1080</height>
<depth>3</depth>
</size>

<segmented>0</segmented>
<object>
<name>pet</name>
<pose>Unspecified</pose>
<truncated>0</truncated>
<difficult>0</difficult>
<bndbox>
<xmin>''' + xmin + '''</xmin>
<ymin>''' + ymin + '''</ymin>
<xmax>''' + xmax + '''</xmax>
<ymax>''' + ymax + '''</ymax>
</bndbox>
</object>
</annotation>
'''
return txt

视频逐帧保存图片程序

1
2
3
4
5
6
7
8
9
10
11
12
13
14
15
16
17
18
19
20
import os
import cv2

images = 'image_video\\'
videos = os.listdir(r'video2img')
c = 0
for i in videos:
path = 'video2img\\' + i
cap = cv2.VideoCapture(path)
while (1):
for j in range(10):
success, frame = cap.read()
if success:
img = cv2.imwrite(images + str(c) + '.jpg', frame)
c = c + 1
print(c)
else:
break
cap.release()